Cuisines

Tuesday, August 11, 2020

Hong Siu Yuk – Shanghainese Braised Pork Belly

Hong Siu Yuk
Hong Siu Yuk with noodles

Due to Melbourne's Stage 4 lockdown restrictions, only 1 person per household can go shopping. Honestly, I had a mini-meltdown because only MrT can go since he drives. I looove to grocery shop and always pick up stuff that's not necessarily on the shopping list (I'm constantly making shopping list). 

I armed MrT with a detailed grocery list (including meats from butcher, deli special, green leafy veg. hahaha) and just hoped for the best.

He came back with a slab of pork belly and knew I would make something delicious out of it. I figured we might as well try a different dish to our go toes Taiwanese LouRouFan or Crispy Roast Pork.

I scoured the internet for Hong Siu Yuk, a Shanghainese braised pork belly dish where the pork just melts in your mouth.

Here's what I did after combining a few Chinese youtube videos.
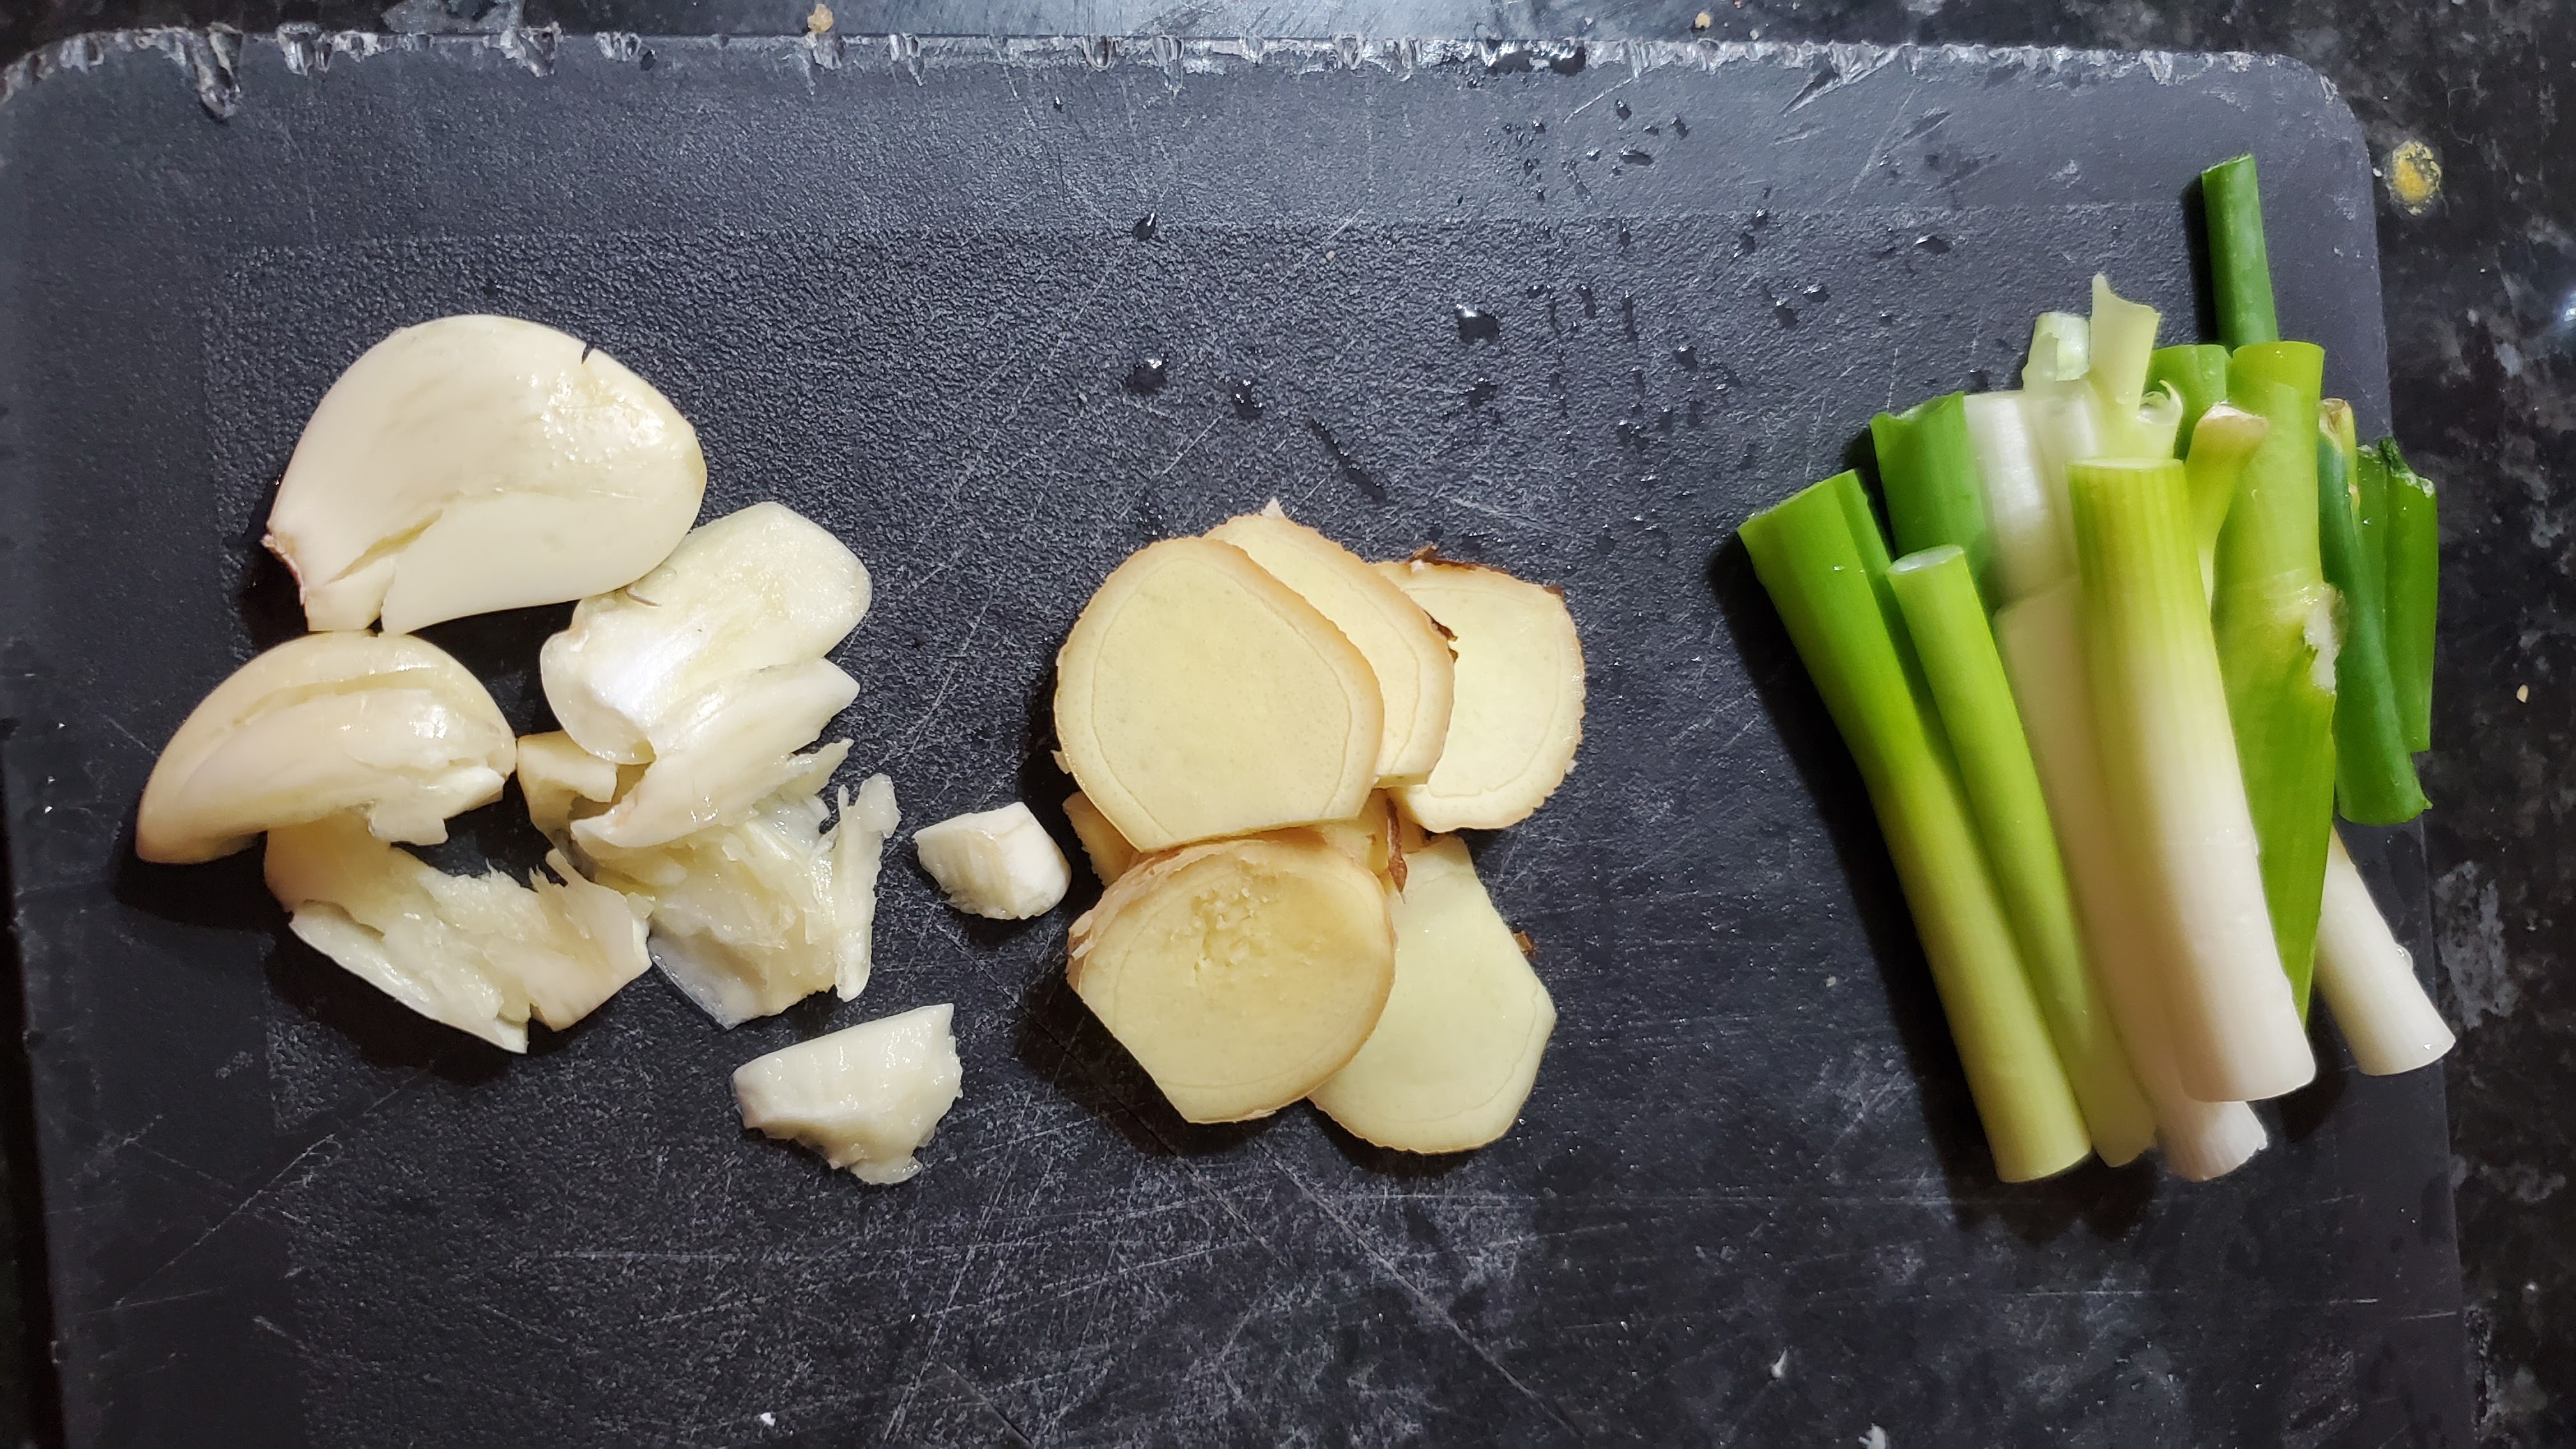
Ingredients

  • pork belly slab (mine was maybe 400g)
  • 3 cloves of smashed garlic 
  • 1 small knob of sliced ginger (half a thumb)
  • 3 spring onions, sectioned
  • 1 tsp Sichuan peppers
  • 2 Star anise
  • 1 tsp Cloves
  • 1/2 Cinnamon stick
  • 1 tbsp Sugar: rock/palm/raw sugar (i used palm)
  • 1/2 cup Chinese Cooking Wine
  • 1 tbsp Chinese Black Winegar
  • 2 tbsp Light Soya Sauce
  • 1 tbsp Dark Soya Sauce (i used kepjap manis)
  • Oil
  • Salt and pepper
Directions:

Blanching pork belly

  • In a large heavy-based pan, add boiling hot water and whole pork belly slab
  • Blanch pork belly for 5–10 mins to remove impurities and a bit of the fatty oiliness
  • Remove from pan, rinse off and cut into big cubes

    Prepare the vegetables

  • Add oil back to the clean pan on medium heat


    Have the dry seasoning ready


  • Add the dry seasoning to the hot oil and fry for a little bit
  • Add the vegetables to the pan

    Fry vegetables and dry seasoning for a bit

  • Add the cubed pork to the pan and brown on all sides

    Let it fry a bit on each side before flipping them


    Have the seasoning ready


    Add seasoning and sugar, top with a bit of water

  • Cover and slowly simmer 

    Check it occasionally and stir to make sure it's not sticking to the bottom

  • Cook it covered for about an hour or 90 mins, depending how hungry you are and how much you can resist the delicious smell wafting through the kitchen. 
  • Season with salt and pepper to taste
  • The pork will be so so soft and melt in your mouth.
  • I quickly blanched rice noodles in hot water and add the noodles to the pan, coating each strand of noodles in the reduced sauce
  • In another pan, add some chopped garlic to peanut oil and saute some spinach
  • Or you can serve this with jasmine rice.
  • Hope you enjoy this!

Sunday, December 1, 2019

Taiwanese Lou Rou Fan - Slow Braised Diced Pork Sauce on Rice

Lou Rou Fan - Diced Pork Sauce on Rice


I love this simple dish ever since trying it for the first time in Sydney over a decade ago. However it's not as prevalent in M-Town so I kinda forgot about it until my visit to Taipei earlier this year. It was everywhere and reminded me of its deliciousness. The pork is so flavoursome and melts in your mouth. It's not too difficult to make either, just need a pinch of patience.

LouRouFan

Ingredients:

  • 500g pork belly, chopped finely
  • 1 large onion, diced
  • 3 spring onion
  • 1 tablespoon ginger
  • 6–8 dried shitake mushrooms - re-hydrated
  • 3 cloves garlic
  • 2 tablespoon sugar
  • 3 tablespoon soya sauce
  • Chinese five spice powder
  • white pepper
  • Chinese cooking wine
  • Sesame oil (optional)
  • salt
  • water from re-hydrating shitake mushroom
  • cornstarch

Directions:

Step 1 – Thinly slice pork and cut into little vertical strips
Step 2 – Finely dice onion
Step 3 – Add pork to hot wok on medium heat, cook until water has evaporated and the pork fat is frying the meat

Step 4 – Add the onion and cook til transparent 

Step 5 – Add white parts of the finely sliced spring onion 

Step 6 – Add minced ginger


Step 7 – Add the finely diced re-hydrated
mushrooms

Step 8 – Add minced garlic

Step 9 – Add sugar to caramelise the mixture

Step 10 – Add soya sauce to the edge of the wok so it sizzles before stirring into the mixture

Step 11 – Add Chinese cooking wine, Chinese five spice powder, white pepper, water from soaking the mushrooms 

Step 12 – Transfer to pressure cooker, top up with water until mixture is completely submerged.

Step 13 –  Cook for 25 minutes under pressure, this is to ensure the flavours meld together

Step 14 – After releasing the pressure, check the sauce and add cornstarch slurry to adjust sauce viscosity, add salt to taste also add a dash of sesame oil and the green bits of spring onion

Step 15 – Serve with medium boiled eggs and some green veggie

Tuesday, August 21, 2018

Homey Mac'n'Cheese with lotsa veggie

Mac n Cheese with lotsa veg

Mr T and I returned from our brief break from sunny and warm Surfers Paradise and was greeted by the wet and freezing cold of M Town.

I was really craving something homey and decide to make mac'n'cheese. It's also Mr T's number 1 comfort food. This is what he would request when he's sick. No Congee for him....

I remember we had this whole head of cauliflower sitting in the crisper section of our fridge that we got at the market nearly a month ago and this long forgotten leek. So thought we'd better use them up now that our oven has been fixed (it was out of commission for nearly 6 months! >.<)

Ingredients (feeds 4 or more)

  • 1/2 packet of pasta (I used macaroni coz I like their shape)
  • 1 whole head of cauliflower, separated into florets
  • 1 leek, sliced finely up to all the edible bits 
  • 3 garlic cloves, chopped finely
  • 1 carrot (grated)
  • 1 red capsicum, diced
  • frozen green peas (optional and use as much as you like)
  • bacon, diced (optional, use as much as you like)
  • butter
  • flour
  • milk
  • white wine
  • 1 egg
  • 1 heaped tablespoon of whole grain mustard
  • mixed herbs
  • Slap ya'Mama (cajun/chili powder - optional)
  • Dukkah (optional)
  • cheese (cheddar, Parmesan, mozzarella)
  • breadcrumbs (optional)
  • Olive oil
  • Salt & Pepper
Directions
  • Season the cauliflower florets with mixed herbs, salt & pepper, slap ya'Mama and Dukkah in a roasting pan (or whatever you'll be making the mac'n'cheese in), place in oven and roast for 20 mins or so, until soften. 
  • Cook pasta on stove top per packet direction til 70% ready (under cook them, because they'l cook further in the oven).
  • In a large saucepan, over medium heat, fry up the bacon bits over a splash of olive oil, add the leek, cook for 5 mins.
  • Add garlic and grated carrots cook for another couple of minutes, add capsicum & frozen peas, keep stirring so they don't stick to pan and everything is thoroughly mixed, season slightly with salt and pepper.
  • Pour out cooked pasta and drain.
  • In pasta pot over medium heat, make a roux with the butter and flour until it's a nice nutty tan/brown colour.
  • Add in milk and white wine, make sure it's NOT bubbling and crack in the egg, keep whisking so it doesn't form a poached egg!
  • Season with whole grain mustard and Slap ya'Mama, keep whisking and add in cheese until it's one gooey gooey glob.
  • Transfer cooked cauliflower to the saucepan of veggies along with the cooked pasta and mix well.
  • Pour the mixture back into the roasting pan and then add in the cheese sauce, top with a sprinkle of breadcrumb to give it that crunchy top 
  • Bake for 20 mins until it's golden. 
  • DIG IN!!!

Monday, May 14, 2018

Taiwanese 3 Cup Chicken (Samg Bui Gai)

So apparently the '3 cups' in 3 cups chicken is in reference to the quantity of soya sauce, Chinese cooking wine and sesame oil in the dish. Unless you're cooking a banquet for 100 people you just need 1 tablespoon each. Though '3 tablespoon chicken' doesn't quite have the same ring to it does it?

This was super quick to make and it was ready to eat before my rice even finish cooking. So I had to wait around smelling this aromatic dish. Not good on a hungry belly.

Ingredients:
3 Cups Chicken
  • 4 chicken thigh fillets (approx 500g)
  • 1 red onion, choppped
  • 1 red capsicum, chopped
  • 2 cloves of garlic, chopped
  • 1 tsp of chopped ginger 
  • red chillies
  • Thai basil leaves
  • spring onion
  • 1 tbsp soya sauce
  • 1 tbsp Chinese cooking wine
  • 1 tbsp sesame oil
  • 1–2 tspn cornstarch
  • 1 tbsp peanut/vegetable oil
Directions:
  • cut up chicken to bite size, I removed the excess fatty bits
  • add cornstarch, soya sauce, cooking wine, sesame oil, ginger and garlic to chicken and mix well
  • heat oil in pan/wok on medium heat
  • add chopped onion and cook for a little til soften
  • add chicken mixture and leave it don't stir for a few minutes
  • add chopped red capsicum to pan and stir to make sure the other side of the chicken is cooked
  • add red chilies, spring oil and Thai basil leaves a few minutes before serving
  • the cornstarch in the marinate would thicken to a nice sauce.
Served hot with white Jasmine rice. yummm


Sunday, July 31, 2016

Meatballs with Romesco Sauce

Mozzarella stuffed spicy meatballs with romesco sauce
Meatballs!

So after visiting the Scorsese Exhibition at ACMI I simply could not get the meatballs that his mom Kathy made out of my head! (And wanting to watch all his movies as well, this guy is a cine-genius!)

I knew I didn't want big fist-sized meatballs because I just find them too dry, eating this massive chunk of mince meat did not appeal to me, but little ping-pong ball size ones filled with gooey mozzarella cheese....ooooh yeah baby! Get in mah belly!

We had pasta at a really cute Italian restaurant in the city after the exhibition, called Il Solito Posto, it was quite cozy and the food there was lovely, will definitely be going back there again. Though then made me crave something less traditional to go with my meatballs, so I decided to go Tapas/Spanish style with Romesco sauce, if you haven't tried it before, it is amazing! My Romesco sauce is made with roasted char-grilled red capsicums, so their flavours really intensify and brings out the sweetness and slightly smokiness, there's almond flakes, breadcrumbs to give the sauce body and other spices like smokey paprika to up the pepper and smokey flavour. It went really well with the meatballs. Here's what you'll need to make this simple but yummy dish.

Romesco sauce ingredients:

  • 2 large capsicums, grilled whole in the oven on high heat for 30 mins
  • breadcrumbs
  • almond flakes
  • tomato
  • garlic
  • smokey paprika
  • chili flakes
  • red wine vinegar/balsamic vinegar
  • salt & pepper
  • basil
  • leek/onion
  • olive oil
Directions
  • Remove grilled capsicums from oven and place in ziplock bags, careful not to lose any of it's juices, this is vital part of the sauce!
  • Let the capsicums cool in bag and remove the skins and the seeds
  • In a blender thingy add all the ingredients except the basil and leek/onion and blitz til smooth
  • In a saucepan, add olive oil and brown/sweat the onion/leek
  • Add in the sauce, it is now ready for the meatballs to be be simmered in.
So let's get right into them.

Meatballs ingredients:
  • 500 g of half pork half beef mince, you can incorporate other mince if you like
  • 1 onion finely chopped
  • 2 cloves of garlic finely chopped
  • 1 egg
  • breadcrumbs
  • mozzarella/bocconcini quartered
  • mixed dried italian herbs
  • chilli powder/flake
  • paprika
  • salt & pepper
  • kasundi

Directions

  • Add all the ingredients except the cheese together, mix well
  • Take a spoonful of the mince mixture and flatted it a bit and add the piece of cheese in the centre, then wrap mince around and roll it up into a ping pong ball size
  • Add them to a fry pan with butter/olive oil to brown on all size, doesn't need to be cooked through.
  • Do this in batches until all the meatballs have been browned, then add them all to the Romesco sauce for simmering for 15-20 minutes until they're cooked through and the sauce thicken up a bit.
  • Serve with some chopped basil and you may top it up with shaved Parmesan cheese if you like.
Yuuummm :D

Sunday, November 15, 2015

Cantonese–style Wonton Noodle Soup

Giant Cantonese–style wonton noodle soup
I was really really craving wonton noodle soup. This is a comfort food for me when I was very young growing up in HK and it has been ages since I've had homemade ones. Frozen wontons are available in supermaket and Asian stores but I find them incomparable to the homemade ones.

T-Rex helped me wrapped these and some of them are pretty ginormous. heheheh.

I confess, it's been awhile since I wrapped any dumplings and I was never very proficient at it. So I watched a few youtube videos on how to fold them. We experimented on a variety of ways to wrap them. It's really up to you, as long as the filling stay inside, it's all good!

Speaking of filling, it definitely needs to have prawns, chunky bits of prawns, so there's some texture to it and not just dry and meatbally.

Ingredients:
  • A package of wonton wrappers
  • A dozen frozen prawns
  • 500g mince pork
  • Minced ginger
  • Spring onion
  • Coriander
  • White pepper
  • Chinese cooking wine
  • Sesame oil
  • Light soya sauce
  • Dry thin egg noodles
  • Choy Sum or any green veggie
  • Wonton soup mix (yeah I know! Being super lazy, but this mix powder gives me the exactly flavour of the soup of my childhood memory)
Directions
  • Defrost the frozen prawns and soak them in cold water and then chop each prawn into 3.
  • Mix prawns with pork mince, herbs and the other seasoning, keep stirring until the mixture seems gooey (at least 5 mins).
  • Now you're ready to wrap, I generally use about 1 tablespoon of filling per wrapper. Fold it up whichever way you prefer. I liked folding them in half in triangles and then folding the ends behind and pressing it in so they look kinda like tortellinis - which I've always thought of as Italian wontons.
  • Get your water boiling in a pot and add the wontons, cook until they float - at least 10 minutes.
  • At around the 5 minute mark, add in the noodle, veggie and soup mix.
  • There you have it, yummy homemade wonton soup. I think I'll add some shitake mushrooms to my filling next time.

Vietnamese Summer Rolls

Yummy vegetarian summer rolls
It was a particularly hot day here in M-town and I really didn't feel like cooking anything after work, or rather turning on the oven and making the apartment even hotter. So I figured some summer rolls would be a great idea, plus T-Rex can also help roll them.

I made vegetarian version for Meat-free Monday and had an addictive spicy peanuty dipping sauce to go with it. I think I crave the sauce more than the rolls.

Here's what you will need.

Ingredients:

  • Rice paper
  • Vermicelli
  • Carrots
  • Cucumber
  • Mint
  • Basil
  • Spinach/Lettuce
  • Hard tofu
  • Peanut butter
  • Hoisin sauce
  • Fresh chilies
Directions:
  • Start by julienne the carrots, cucumber and tofu
  • Cook the vermicelli according to the direction on the package (soak in hot water) and then drain
  • Get a big bowl and fill it with cold/room temperature water for the rice paper, if you use hot water the rice paper becomes too soft and tears very easily.
  • Lay out the damp (but still "rigid") rice paper on a plate/board and add a handful of the noodles to the lower third of the paper, top up with the other fillings and herbs, be careful not to overload, else it's very difficult to wrap it up.
  • By this time, the paper would have soften enough, fold the bottom up, then the two sides and then just roll it up. TaDa!
  • For the sauce, I usually use a ratio of 2 spoons of peanut butter to 1 spoon of hoisin sauce, top with hot water to your desired sauce consistency and add fresh chopped chili to your spice level, I added about 4 chilies.
  • Enjoy! You can try other cooked fillings as well, maybe smoked salmon, prawns, chicken slices. Be creative :)